How do I create a timeline on PowerPoint? The step-by-step guide
We offer you our detailed step-by-step guide to creating a clear, comprehensive, and personalized PowerPoint timeline.

PowerPoint is full of tools for creating clear, compelling, and original presentations. But have you ever thought of integrating a timelines ?
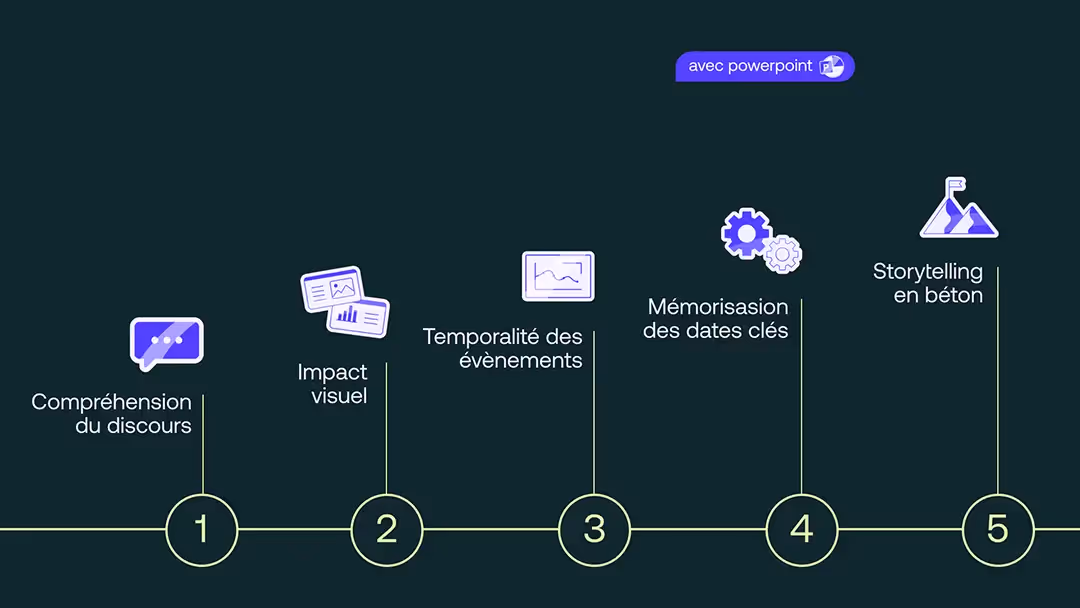
Adding a timeline to your presentation means using a powerful visual tool. It makes time sequences immediately readable, facilitates understanding... and captures the attention of your audience.
Whether it's a project, a company story or an event schedule, the chronology becomes a real ally. Here is our practical step-by-step guide to creating one that makes an impression.
Why integrate a timeline into your PowerPoint?
What is a timeline?
On PowerPoint, a timeline is a visual representation of events or steps in time, arranged linearly (or circular, if you're in a creative mood!).
It allows information to be structured gradually and fluidly: your audience visualizes at a glance the key dates, logical steps and the evolution of a project or story.
The timeline is used for visualize the reference phases of a project, a story (brand or Corporate, for example) or a strategy.
Top reasons to use a timeline with PowerPoint
A PowerPoint timeline allows you to:
- structure your ideas in a fluid way;
- clarify the sequences and the temporality of a project or story;
- create an engaging overview;
- visually support your Storytelling ;
- make an impression through a clear and dynamic narration.
The PowerPoint timeline: when should you use it?
Now that we've detailed how a timeline on PowerPoint works and benefits, let's take a look at it together The cases in which it can be used.
Timeline is particularly useful for:
- Of project presentations, to explain the main steps: the planning and the planned development phases, the launch date, the deadlines deliverables and closing deadlines.
- Of educational training, to integrate a slide on a historical period, a scientific progression, the appearance of a concept.
- Of activity reports Yearly, to present a summary with the highlights of the year, the milestones achieved and the actions carried out monthly.
- One product launch or brand, to clarify the design.
- Of meetings with partners or customers, to visualize the joint roadmap!
Creation steps: your PowerPoint timeline from A to Z
Prepare the content of your chronology well
To obtain an impeccable chronological timeline, you need prepare the contents carefully, in order to lay solid foundations. To do this:
- Start with identify key events and dates that you want to appear on the timeline.
- Think about the length that you want to give to your frieze (period covered, level of detail).
- Before you insert your items, make a short Brainstorming on the visual aspect of your timeline, so that The data are easily identifiable.
Create a timeline with built-in tools
Once your elements are listed and organized, it's time to create! PowerPoint provides you with a range of tools to build a clear and visually attractive frieze.
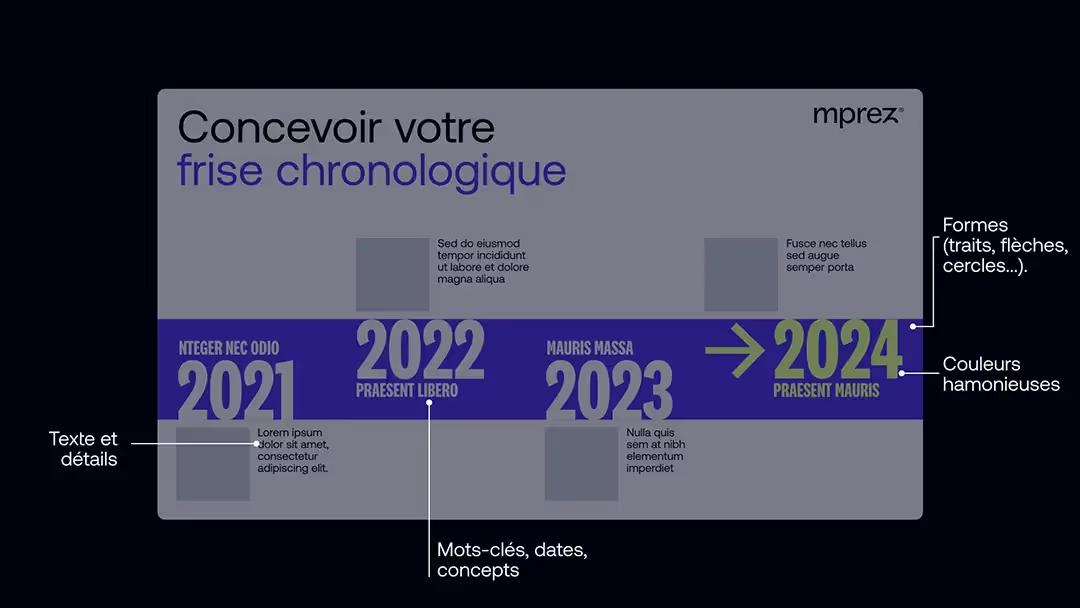
Gradually add:
- ofthe text to detail events or milestones;
- Of strong keywords and concepts to be developed orally;
- Of colours harmonious in line with your graphic charter;
- Of shapes (lines, arrows, circles, visual cues).
Think of the visual coherence : a good frieze is balanced, well spaced, perfectly aligned. Cleanliness, clarity and legibility are your best allies in keeping your audience's attention... and making an impression.
Integrate your brand graphic charter into your PowerPoint
We are coming to the final stage of creating your timeline on PowerPoint: the integration of your graphic charter.
Essential element, your corporate branding guarantees a professional result, while bringing your custom claw. Use your brand's official colors and fonts, and don't forget to include your logo!
The graphic elements of your brand can even be used as small reference icons, for example for your key dates.
It is this attention to detail that reinforces the coherence of your visual universe.
Additional tips for a quality timeline
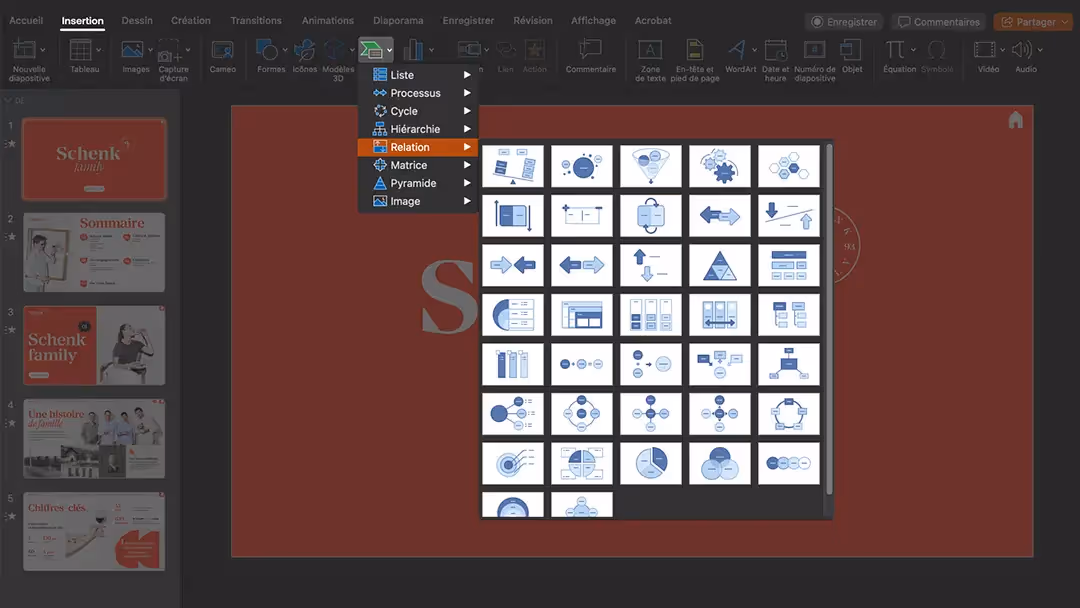
Use SmartArt for a personalized timeline
Feel free to personalize your timeline, thanks to The SmartArt tool on PowerPoint. You can access it via the “Insert” tab. You will see, it is magical.
Once in the menu, select a timeline or a process model tailored to your content. With this tool, you Automate partly your work: a real gain in efficiency!
Betting on dynamic and interactive content
Once your timeline is created, you can customize as desired so that it stays true to your brand. You can therefore add:
- Of animations of gradual onset;
- Of ties hypertexts;
- Of pimples of exploration;
- Of transitions, for a slightly more theatrical staging;
- Of resources additional.
If you have a playful spirit, you can test and choose different options, all while staying in visual harmony And the consistency with the other slides of your presentation.
Summary of best practices for a professional chronology
The essential tips to keep in mind when creating your timeline are the ones that allow you to: a very professional end result. Your priorities:
- Always keep a optimal readability, even from the back of the room!
- Valuing The harmony of colors and elements of the frieze, to avoid a garish or disordered appearance.
- Offer a airy chronology to your audience. To do this, your motto is “focus on the essentials”, to be completed by a well-crafted speech!
Create a timelines with PowerPoint does not require advanced graphic skills, but a minimum of method and clarity. Well used, it Reinforce your message, Structure your presentation and values your professionalism.
And if you want to go further, The Mprez experts are there to help you design powerful media, custom-designed and designed to convince. Let's talk about it!